ここでは、Eclipse を使用して MapReduce プログラムを開発および実行する方法を説明します。

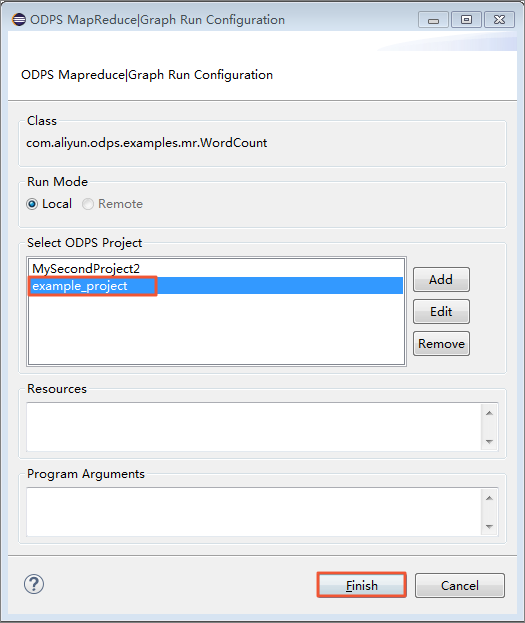
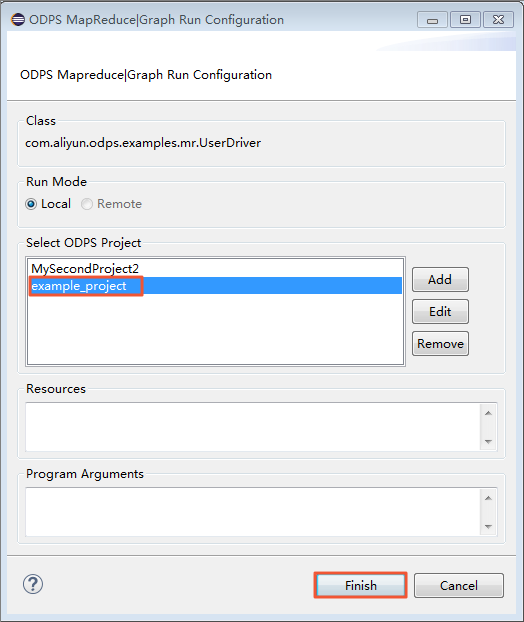
ダイアログボックスが表示されたら、[example_project] を選択し、[Finish] をクリックします。
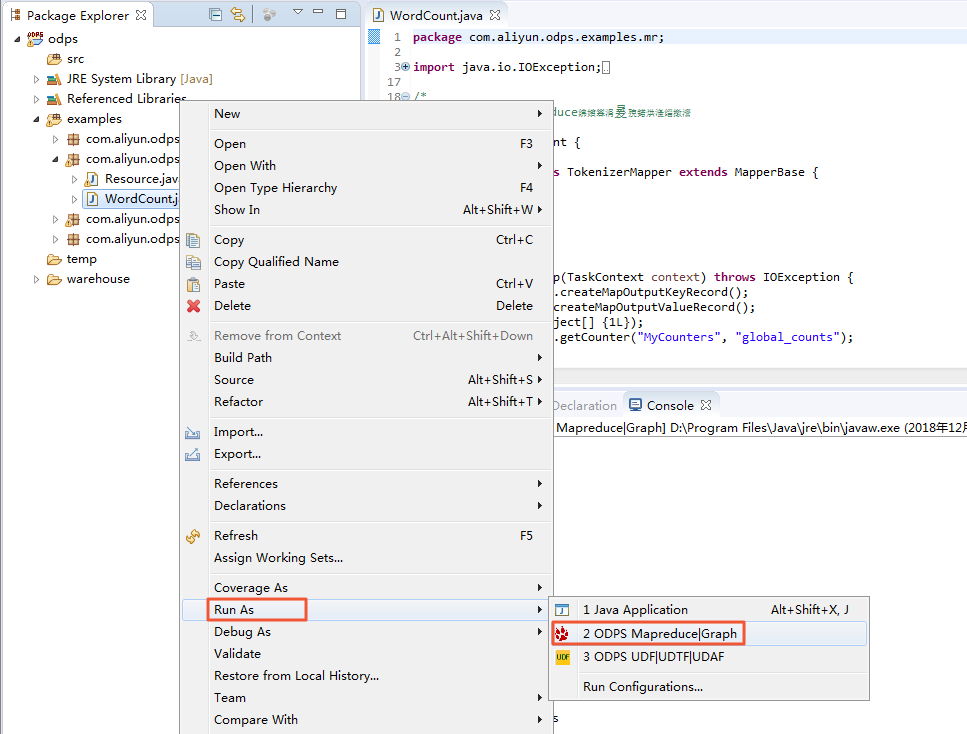
ユーザー定義の MapReduce プログラムの実行
package odps;
import java.io.IOException;
import com.aliyun.odps.data.Record;
import com.aliyun.odps.mapred.MapperBase;
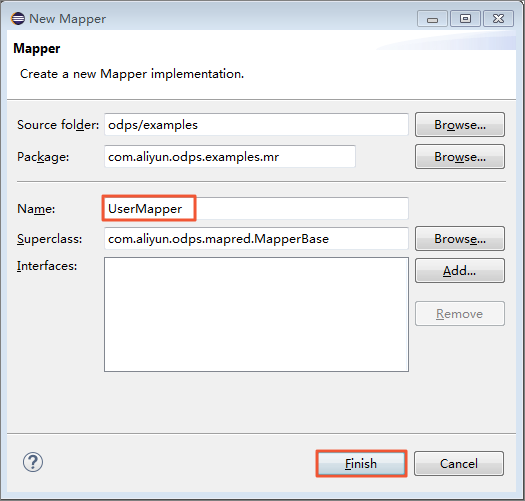
public class UserMapper extends MapperBase {
@Override
public void setup(TaskContext context) throws IOException {
@Override
public void map(long recordNum, Record record, TaskContext context)
throws IOException {
@Override
public void cleanup(TaskContext context) throws IOException {
テンプレートでは、設定されたパッケージ名のデフォルトは odps になります。 実際の要件に応じて変更します。 テンプレートの内容を次のように記述します。
package odps;
import java.io.IOException;
import com.aliyun.odps.counter.Counter;
import com.aliyun.odps.data.Record;
import com.aliyun.odps.mapred.MapperBase;
public class UserMapper extends MapperBase {
    Record word;
    Record one;
    Counter gCnt;
    @Override
    public void setup(TaskContext context) throws IOException {
          word = context.createMapOutputKeyRecord();
          one = context.createMapOutputValueRecord();
          one.set(new Object[] { 1L });
          gCnt = context.getCounter("MyCounters", "global_counts");

    @Override
    public void map(long recordNum, Record record, TaskContext context)
            throws IOException {
          for (int i = 0; i < record.getColumnCount(); i++) {
              String[] words = record.get(i).toString().split("\\s+");
              for (String w : words) {
                word.set(new Object[] { w });
                Counter cnt = context.getCounter("MyCounters", "map_outputs");
                cnt.increment(1);
                gCnt.increment(1);
                context.write(word, one);


    @Override
    public void cleanup(TaskContext context) throws IOException {
同様に、 src ディレクトリを右クリックし、 の順に選択します。
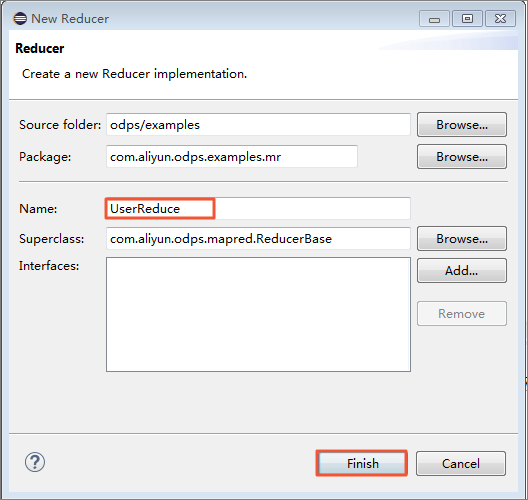
Reduce クラスの名前を入力します。 この例では、クラス名として UserReduce を使用します。
Package Explorer では、ファイル名 UserReduce.java が src ディレクトリに生成されます。 このファイルの内容は、Reduce クラスのテンプレートです。 テンプレートを以下のように編集します。
package odps;
import java.io.IOException;
import java.util.Iterator;
import com.aliyun.odps.counter.Counter;
import com.aliyun.odps.data.Record;
import com.aliyun.odps.mapred.ReducerBase;
public class UserReduce extends ReducerBase {
    private Record result;
    Counter gCnt;
    @Override
    public void setup(TaskContext context) throws IOException {
          result = context.createOutputRecord();
          gCnt = context.getCounter("MyCounters", "global_counts");

    @Override
    public void reduce(Record key, Iterator<Record> values, TaskContext context)
            throws IOException {
          long count = 0;
          while (values.hasNext()) {
            Record val = values.next();
            count += (Long) val.get(0);

          result.set(0, key.get(0));
          result.set(1, count);
          Counter cnt = context.getCounter("MyCounters", "reduce_outputs");
          cnt.increment(1);
          gCnt.increment(1);
          context.write(result);

    @Override
    public void cleanup(TaskContext context) throws IOException {
package odps;
import com.aliyun.odps.OdpsException;
import com.aliyun.odps.data.TableInfo;
import com.aliyun.odps.examples.mr.WordCount.SumCombiner;
import com.aliyun.odps.examples.mr.WordCount.SumReducer;
import com.aliyun.odps.examples.mr.WordCount.TokenizerMapper;
import com.aliyun.odps.mapred.JobClient;
import com.aliyun.odps.mapred.RunningJob;
import com.aliyun.odps.mapred.conf.JobConf;
import com.aliyun.odps.mapred.utils.InputUtils;
import com.aliyun.odps.mapred.utils.OutputUtils;
import com.aliyun.odps.mapred.utils.SchemaUtils;
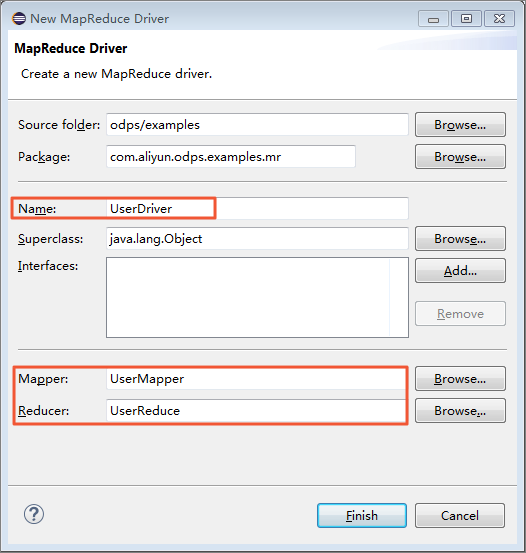
public class UserDriver {
public static void main(String[] args) throws OdpsException {
JobConf job = new JobConf();
job.setMapperClass(TokenizerMapper.class);
job.setCombinerClass(SumCombiner.class);
job.setReducerClass(SumReducer.class);
job.setMapOutputKeySchema(SchemaUtils.fromString("word:string"));
job.setMapOutputValueSchema(SchemaUtils.fromString("count:bigint"));
InputUtils.addTable(
TableInfo.builder().tableName("wc_in1").cols(new String[] { "col2", "col3" }).build(), job);
InputUtils.addTable(TableInfo.builder().tableName("wc_in2").partSpec("p1=2/p2=1").build(), job);
OutputUtils.addTable(TableInfo.builder().tableName("wc_out").build(), job);
RunningJob rj = JobClient.runJob(job);
rj.waitForCompletion();
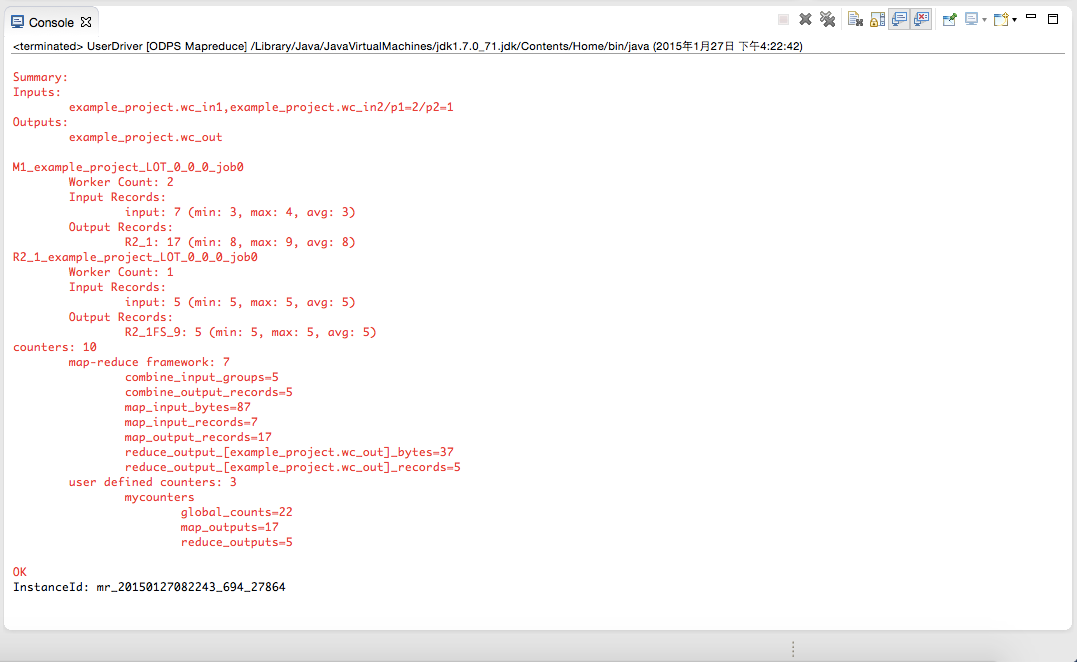
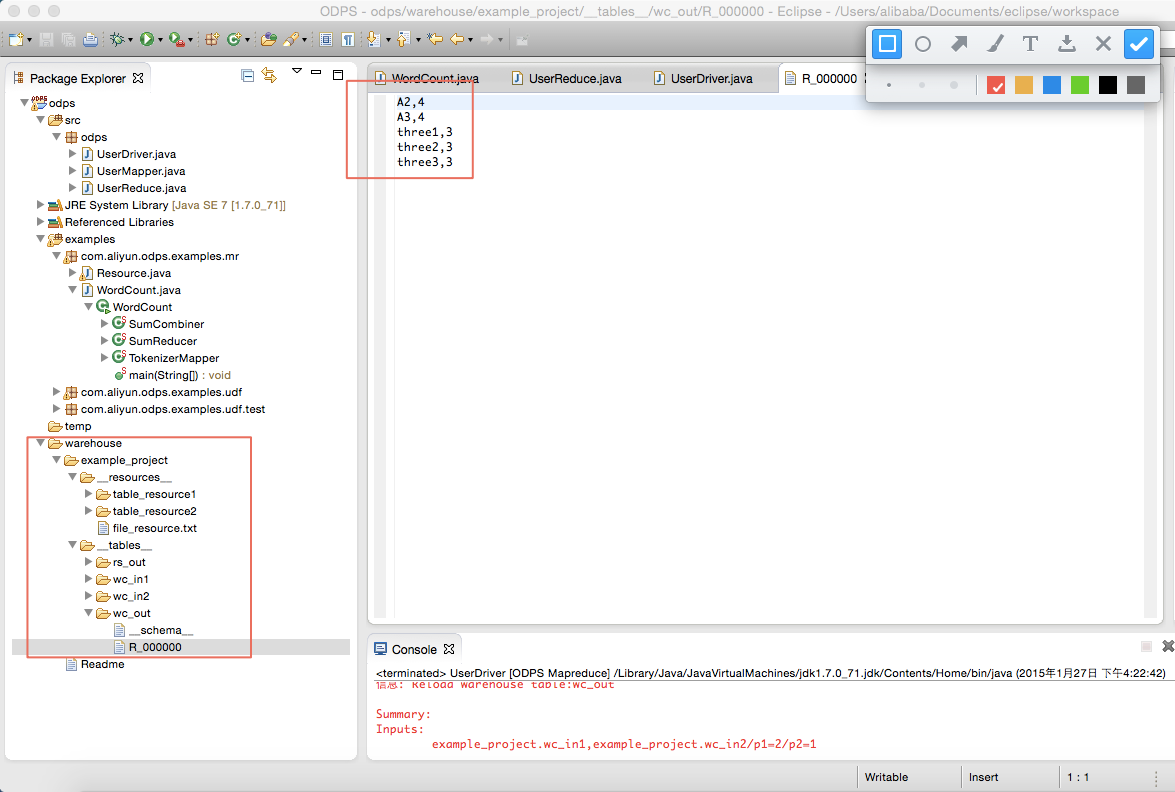
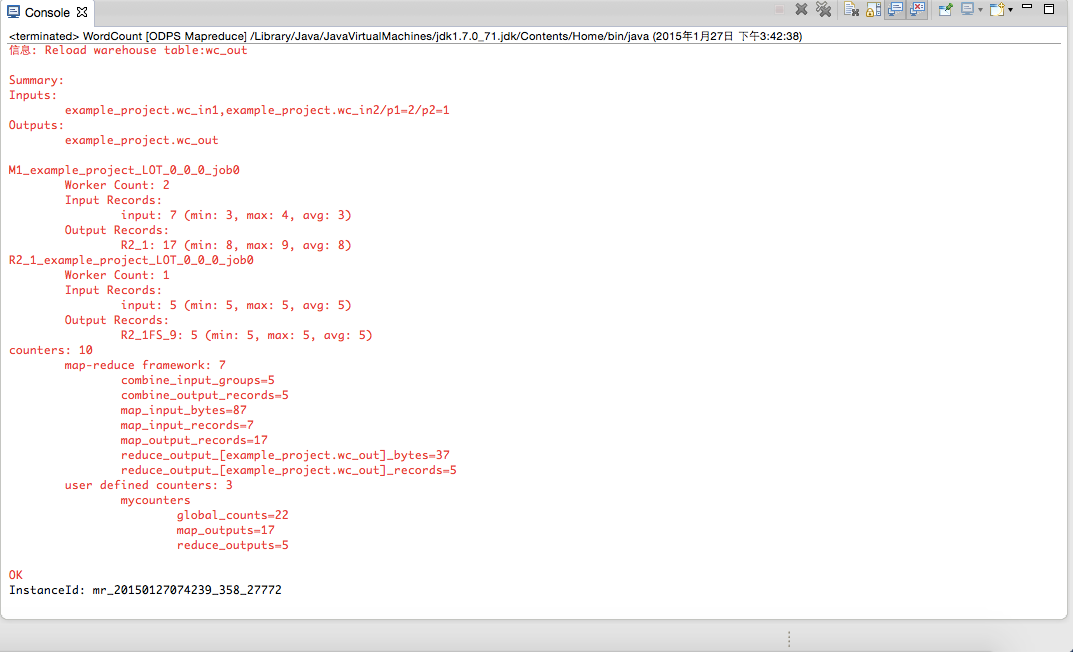
wc_out は出力ディレクトリ、R_000000 は結果ファイルです。 ローカルデバッグにより、結果が正しいことを確認し、Eclipse のエクスポート機能を使用して MapReduce プログラムをパッケージ化します。 パッケージ化した後、jar パッケージを MaxCompute にアップロードします。 分散環境で MapReduce を実行する方法については、「クイックスタート」をご参照ください。
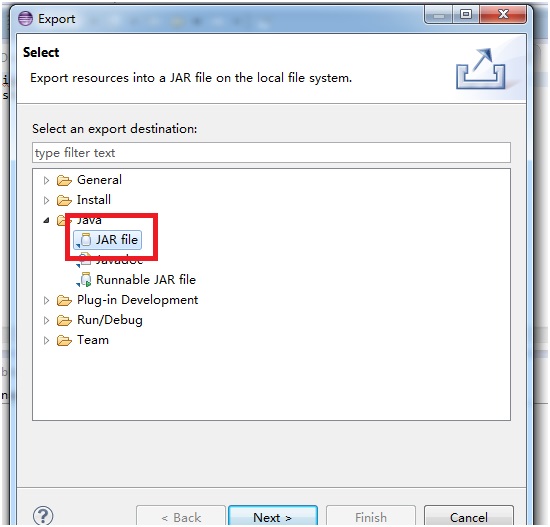
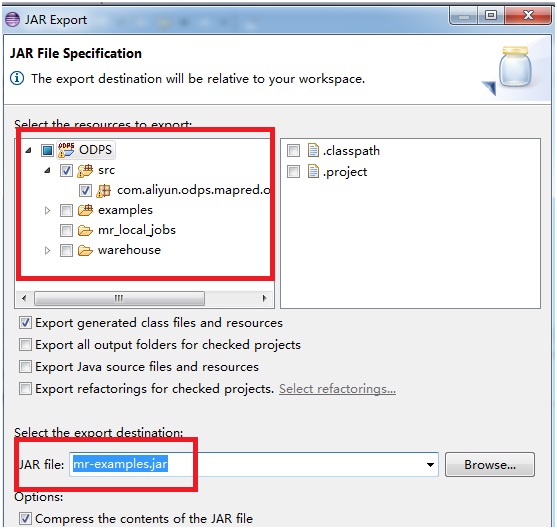
[Next] をクリックして jar ファイルをエクスポートします。
ローカルで新しいプロジェクトの作成をシミュレートする場合は、warehouse ディレクトリにサブディレクトリ (example_project と同じ階層) を作成します。 ディレクトリの階層構造は次のように表示されます。<warehouse>
|____example_project(Project Dirctory)
|____ <__tables__>
| |__table_name1(non-partition table)
| | |____ data(File)
| | |____ <__schema__> (File)
| |__table_name2(Partition Table)
| |____ partition_name=partition_value(partition directory)
| | |____ data(file)
| |____ <__schema__> (file)
|____ <__resources__>
|___table_resource_name (table resource)
| |____<__ref__>
|___ file_resource_name(file resource)schemaの例
Non-partiton table:
project=project_name
table=table_name
columns=col1:BIGINT,col2:DOUBLE,col3:BOOLEAN,col4:DATETIME,col5:STRING
Partition table:
project=project_name
table=table_name
columns=col1:BIGINT,col2:DOUBLE,col3:BOOLEAN,col4:DATETIME,col5:STRING
partitions=col1:BIGINT,col2:DOUBLE,col3:BOOLEAN,col4:DATETIME,col5:STRING
Note:
Currently, the following five data formats are supported: bigint,double,boolean,datetime,string, which correspond to the data types in java: -long,double,boolean,java.util.Date,java.lang.String.1,1.1,true,2015-06-04 11:22:42 896,hello world
\N,\N,\N,\N,\N
Note:
The time format is accurate to the millisecond level and all types are represented NULL by '\N'.- MapReduce プログラムがローカルで実行されている場合、デフォルトでは対応するテーブルまたはリソースが warehouse ディレクトリから検索されます。 テーブルまたはリソースが存在しない場合は、対応するデータがサーバーからダウンロードされ、warehouse に保存されます。 その後、ローカルで MapReduce を実行します。
- MapReduce の実行が終了すると、warehouse のディレクトリが更新され、生成された結果が表示されます。